


I can understand the dealer cost as this is a time consuming job. It is also a pain in the butt to do because of the difficulty in accessing the rear valve gaps. In the end I am happy that I carried out this service.
Before you start * Warning you use any information found here at your own risk *
You should not proceed with this adjustment if you are:
1. Not familiar with working around an engine.
2. Don't have a basic idea of how your valves work.
3. Are unsure of the correct way to disconnect/reconnect wiring connectors and the battery.
4. Don't understand why you have to be careful not to get any contaminants into the open intake manifold and spark plug holes and how to take steps to stop that happening.
5. Don't understand why the intake manifold, manifold cover and valve cover bolts have to be removed in the reverse sequence to their installation torque sequence.
You will get yourself into serious and very costly trouble if you rush this DIY or make a mistake, especially the wrong mistake.
If after reading this DIY you are unsure of the procedure then don't proceed
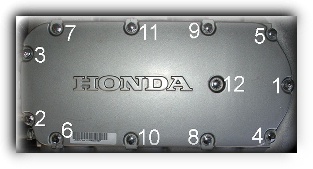
Fig 1. Upper cover removal sequence
)
Fig 2. Upper manifold removal sequence
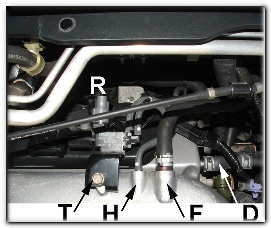
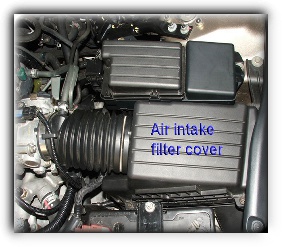
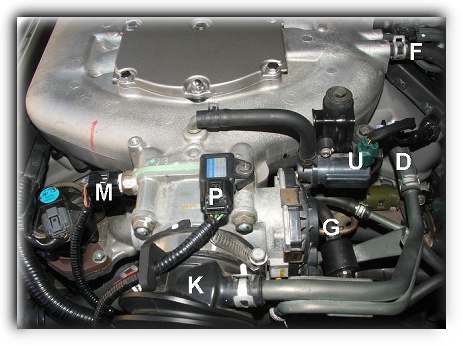

Fig 3. Valve cover removal sequence
The hardest part of this procedure is getting the electrical cabling out of the way of the rear valve cover. You will need to unplug and cover all the connectors going to the intake manifold and the Intake manifold duct. The coolant lines going to the intake manifold have to be disconnected and plugged to stop fluid leaking.
The manual requires three preliminary tasks to be done:
1. The fuel system pressure must be relieved. I am not sure why as the fuel system is not going to be touched and the ignition is not going to be turned on.
2. Drain the coolant. I feel that this is unnecessary. If the coolant lines to the manifold are disconnected at the throttle body and plugged you should not need to drain the coolant or only need to drain about half a litre to bring the level below the top hoses.
3. The battery should be disconnected. Apart from the obvious, this is a good precaution in case you accidently short a connector or damage a wiring loom. It also removes the possibility of the car being turned over with the engine partly dissembled - I have heard of this happening.
The other important safety point concerning the battery is that the air bags are a safety hazard if you are working near them and they are trigged by something that you do. Disconnecting the battery should solve this - however you should wait some time to allow any residual charge to bleed off after disconnecting the battery before working near an air bag.
Note: You may need to do an PCM Idle learn procedure when the battery is reconnected. You will need to reset the clock, you may need to enter radio security codes and you may have to reset the power window control unit.
So play it safe by disconnecting the battery and relieving the fuel pressure.
The basic steps are as follows.
Relieve fuel pressure:
1. Remove the left kick panel then remove the PGM-FI main relay 2 (Fuel Pump).
2. Start the engine and let it idle until it stalls.
3. Turn the ignition off and remove the fuel filler cap. - Don't forget to do it up after the intake manifold is reinstalled.
Disconnect the negative battery terminal.
NOTE - Make sure you have any radio security codes before doing so.
Drain 1/2 a litre of coolant. in to a large container. The drain tap is at the bottom rear centre of the radiator. if you are not replacing the coolant at this service and If the fluid is clean you can pour it into a bottle and reuse it.
NOTE- You will have to purge the cooling system of air when the car is restarted.
Now the following steps.
1. Remove Intake air filter cover - four bolts - lift the cover off by pushing it towards the engine and raising the back of the cover.
2. Remove filter - note the orientation. Protect the filter from dirt. Gently lever the cover away from the flexible coupling.
3. Remove front ignition coil cover - the black plastic thing across the front of the motor.
4. Disconnect ignition coil connectors. - A - Never pull on any wiring, only pull by holding the solid connector plastic housing.
5. Remove three front bank ignition coils - B - held in place with Allen head bolts. - C
6. Remove three rear ignition coils - they should slide straight out - don't use any force.
If you have a compressor, now would be a good time to blow any crud out of the spark plug tubes. If you don't have a a compressor, attach a narrow tube (one that will fit easily into the spark plug holes) to the end of the vacuum cleaner hose, make a tight seal with tape around the larger vacuum cleaner hose and then try to remove any dirt or loose crud from inside the spark plug holes, especially around the spark plug bases.
NOTE - Do not remove the spark plugs to do this - Leave them in the head. Clean or wipe any dirt and loose material from around the valve covers and engine as you go along. Keep everything as clean as you can.
7. Remove breather pipe from the rear valve cover. - D
8. Remove PVC hose. - E
9. Remove break booster hose. - F
10. Remove EVAP canister hose. - G - See Step 19 - I left the hose connected and removed the valve and tied it back out the way.
11. Remove vacuum hose. - H
12. Remove water bypass hoses and plug them to stop leaks. - J
13. Remove flexible air intake coupling tube and cover the air intake opening. - K
14. Remove IAT sensor connector. - M
15. Remove throttle actuator connector. - N
16. Remove MAP sensor conector. - P
17. Remove engine mount solenoid valve connector. - R
18. Remove engine mount solenoid and tie out the way. - T
19. Remove EVAP purge valve connector. - U. I removed the EVAP valve, tie it against the firewall with the hose in step 10 connected.
20. Remove upper cover mounting bolts and nuts sequentially in three steps. - Fig 1
21. Remove upper cover and gasket - note how the gasket is orientated. - Take a picture.
22. Remove upper intake manifold mounting bolts and nuts sequentially in three steps - Only move then slightly on the first sequence.
23. Remove upper intake manifold and spacer (gasket) note the orientation of the gasket - Fig 2 - Do not use any force when removing it. Place the manifold in a safe place; make sure that nothing can get into any opening in the manifold.
24. Vacuum exposed intake mating surface and remove any debris that may have dropped as you removed the upper intake manifold,
also looking for any aluminium fillings that may have come from the guide bolt interference with the intake manifold as it was lifted off.
25. Cover the lower intake manifold opening with plastic wrap.
26. Place old intake gasket over the guide bolts and over the wrap to keep it in place.
27. Now vacuum or wipe away any dirt on the exposed valve covers and surrounding area.
28. Remove three bolts holding the wiring harness holder to the front valve cover.
29. Remove dipstick.
30. Remove bolt holding the power steering hose clamp to the rear valve cover and tie it out the way.
31. Remove two bolts holding the wiring harness holder to the rear valve cover. Hold the wiring harness up with a cable tie.
You may have to relieve the strain or move some of the wiring connectors from their brackets to get enough slack to raise the main cable channel high enough.
32. Remove 5 bolts holding the front valve cover and remove the cover - Fig 3 - You may have to tap the side of the cover slightly with a rubber mallet (or block of soft wood) to break the seal of the rubber gaskets. Carefully lift the covers away from the head a little to clear the spark plug tube seals and then remove the cover to a clean place.
33. Use a rag to soak up excess oil along the bottom of the head, wipe the lower edge to stop oil seeping down the front face of the head.
34. Remove 5 bolts holding the rear valve cover and remove the cover. See step 32.
35. Use a rag to soak up excess oil along the bottom of the head, wipe the lower edge to stop oil seeping down the back face of the head.
36. Place the valve covers somewhere clean. Later clean the outside of the covers and apply a little polish to make them shine again. Clean any area that you can now reach in the motor and engine compartment. Makes it a lot easier to spot oil leaks and work on the motor in the future.
)
)
Small inspection cover on the timing belt cover. This is on the rear cover, the one on the front looks the same. It's the front cover we want.
Front valve cover removed. Note how the intake area at top of pix is covered with plastic to keep crap out.
Click for bigger picture
Click for bigger picture
Upper intake removed. Clean and cover the exposed intake chambers. Don't let anything get in there.
Click for bigger picture
Click for bigger picture
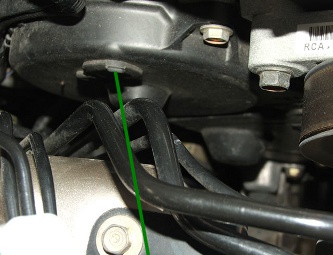
Getting the electrical cabling out of the way of the rear valve cover is not easy but you can get it high enough to remove the valve covers. Once high enough use a cable tie to hold it.
Now comes the fun part - Adjusting the valves. The engine must be stone cold. Leave it standing overnight after driving to be sure.
Now comes the fun part - Adjusting the valves. The engine must be stone cold. Leave it standing overnight after driving to be sure.
